Showing posts with label Escape. Show all posts

Wednesday, September 25, 2013

another Adrienne Alvis layout | inspiration


Hello Evalicious fans!  I'm here again today sharing a layout I created using some of the wonderful products you can find in the shop.


I was really inspired by the adorable Documented Cloud Tags and badge buttons from the Escape collection for this layout.


I used my sewing machine to stitch a large random circle design onto my page and then misted several different ink colors around it.  I layered badge buttons over the cloud tags and used a few sequins for extra sparkle.


I stamped the ampersat symbol onto some vellum and then layered it around the embellishment cluster above my title.


Supplies Used:  Ampersat and Ampersand Stamp Set, Escape v1 Badge Button, Escape v3 Badge Buttons, Escape Miscellany Tags, Escape Snipsnip Labels

I want to thank Eve again for having my here this month at Evalicious and I really enjoyed working with her amazing products and sharing my work with all of you :)  Have a wonderful day!

Monday, September 16, 2013

Meet Adrienne Alvis | Guest DT inspiration


My name is Adrienne Alvis and I live in a very small town in Southern Illinois (United States). My husband is a farmer and we live in the country with our three beautiful and spirited children. I have two boys (11 and 6 years) and one girl (4 years). My husband and I have been married for almost 8 years now and I'm lucky to be able to stay at home with my children and create.  I recently turned 31 on August 31st.  Other than scrapbooking, I like to run, ride my bike, read, snuggle with my kiddos, and take lots and lots of pictures of all of our everyday adventures. 

I started scrapbooking about seven years ago and instantly fell in love!  At first, I only scrapbooked in my spare time as a hobby, but recently it has become a huge part of my everyday life.  I'm currently designing for Come On Get Crafty, Chic Tags, Lily Bee, Gossamer Blue, Scrapbook Circle, and Freckled Fawn.  You can find more of my work on my blog, Paper Fab, and on Instagram @adriennealvis.  
************************************ 

Hello everyone!  I'm so excited to be guest designing here on the Evalicious blog this month!  Today I have my spread for Week 35 of my Project Life to share with you...


I've done a really good job of keeping up with this amazing project this year and haven't gotten behind yet.  I set aside a certain time every week just for doing my Project Life spreads.  This week was also a special one because I turned 31 on the 31st!


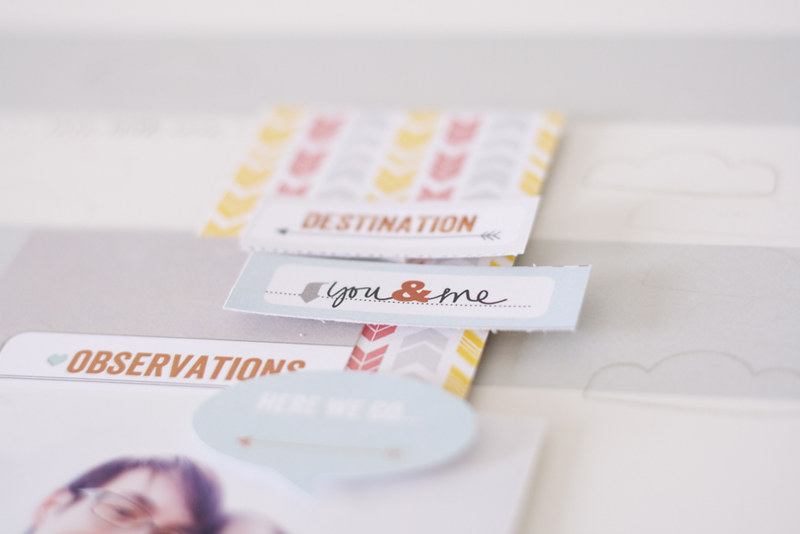
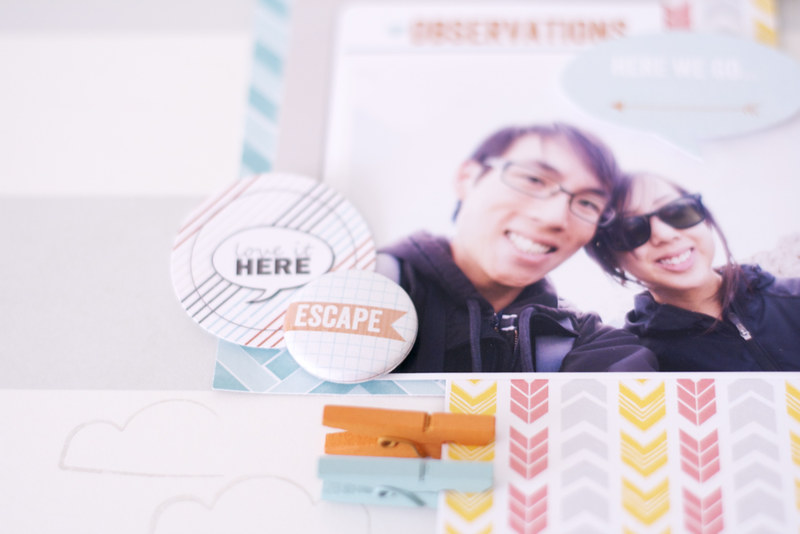
I used lots of goodies from the Escape collection on my spread, such as the 3x4 snipsnip labels, miscellany tags, and a few badge buttons...


I used two 3x4 photos of my boys on a bungee ride at our local fair, adhered them to a larger piece of card stock, and then sewed down the middle of them and through the "Look Here" Escape page tab so I could lift each side up and have a hidden journaling spot.


I stamped the large ampersat stamp onto a journaling card and then colored it in using some of my watercolor ink.


I also did the same to the "oh shoot" camera stamp below...


Supplies Used:  Escape Bundle, My Favorite Stamp Set, Ampersat and Ampersand Stamp Set, My Week snipsnip tags, Real Life snipsnip tags, Love You Lots snipsnip page tabs 

I hope you enjoyed this little peek into my everyday life!  Thanks for stopping by and have a great day!

*************************************
 
Big thank you to Adrienne for being a guest DT on this little blog.
 
While I'm not sure if I'm heading down the route of another design team, I'm definitely wanting some fresh projects on this blog. So what I did was approach some ladies and see if they were interested in being a guest DT. Are you interested in being a guest DT member? Here's how I've been looking...sometimes I go through my previous DT application list (how I found Adrienne:)). Sometimes I go by referrals to my site (meaning I check my shop and see who has been referring guests to my shop - my way of saying thank you). Happy Monday!

Friday, June 28, 2013

Lake Poway | Inspiration

Happy Friday, Evalicious fans!  Christine here to show you a page I made about the hike we did at Lake Poway with my husband’s parents.  We were fortunate that my in-laws were visiting the week of Father’s Day, and we got to spend the day with them!

20130627-IMG_0974_Evalicious

I used a number of tags from the Escape collection, because the colors and sentiments went so well with my photo and our hike.

I love using paper scraps where I’ve punched out something or cut something out with my Silhouette!  I save those pieces of paper and then use them to layer on other layouts, like I did here with the yellow chevron paper.

20130627-IMG_0980_Evalicious

Another favorite technique of mine is to sprinkle stamping around the page.  I used the Destination Prompts Stamp Set throughout this layout.

20130627-IMG_0986_Evalicious

With all the angular paper shapes on the layout, I made sure to include some circular elements to break up the angles.  The circle tags and badge button does that quite nicely!

20130627-IMG_0982_Evalicious


Evalicious supplies:

Hope you are enjoying your summer so far!  For our friends in the Southern Hemisphere, hope you are staying warm!  Have you created with Evalicious goodies?  We would love to see them in our Flickr group!

Have a great weekend!

Christine

Monday, June 24, 2013

Whole World | Inspiration

Hi guys, it's Natalie here to share with you a recent page I've made using my delicious Evalicious embellishments (try saying that 3 times fast!!!)


I can't get over how much older than her 3 years my daughter looks in this photo. On the other hand, I'm not so much digging how many chins this angle makes me appear to have. It's a little insight into the future for both of us probably ;-) Anyway, that's not the point! I'm here today to show you some of the ways I put my Evalicious supplies to good use.


Firstly, I'm all about the clustering. No floating embellishments here, it all has to be touching something. I've paired the Escape Miscellany Tags with the Documented Circle Tags because they're both round which seems to make sense, and then I've added dimension by popping an Escape V1 badge button on top too.


Secondly, I'm all about the layering. The more layers of paper I can fit behind my photo the better, in my opinion. Going from front to back I've got: my photo, a Love You Lots 3x4" Tag (with the banner cut out so it actually then sits in front of the photo), patterned paper, a Documented Label Tag, more patterned paper and lastly another Love You Lots 3x4" Tag.


And thirdly, no project is complete for me lately without some stamping. Stamping details can be added just for background noise like I've done here with the tiny hearts and 'a note' and 'evidence' etc etc. But you can also turn your stamped images into stand-out embellishments too like I've done with the eye-catching pink 'and so it goes'.

Evalicious Supplies:
Escape Miscellany Tags
Escape V1 Badge Buttons
Documented Circle Tags
Documented Label Tags
Love You Lots 3x4" Tags
And So It Goes stamp
Typewriter Love stamp set
Arrows and Words stamp set
You Make Me Smile stamp

I hope you've enjoyed my little journey into my creative process today. If you would like to share any of your Evalicious projects then we would love to see them posted in our Flikr gallery!

xxx
Natalie

Monday, June 10, 2013

just another self portrait | tutorial

good morning! alissa here today with another monday morning tutorial/inspiration page.

today i want to talk a little bit about customizing your Evalicious stamps to suit your needs and to make a custom background.

here's my page...

i wanted to create a custom camera background and i love the camera on the smile camera stamp
but i just wanted the camera and not the "smile". so, i took my exacto knife to the stamp, with a sharp blade. after several careful passes of the blade, i now have 2 stamps. a cute camera and one that says "smile". 

then, i was able to carefully stamp each row of stamps, leaving space to add gold embossed stamps here and there. fun, right? :)

next up i used a page from my love you to pieces art journal kit (that i hadn't used) to layer in the stitched tag element. a perfect place for my journaling, too.

finally, the banner pieces at the top of the layout were all cut from one journal card in the real life snipsnip 3x4 tags. the arrow was on one side and the chevron paper from the other side.  (i just love how i can use the 3x4 cards just like i would use smaller pieces of patterned paper. they are not just for journaling or project life type projects. :)

here are a few more shots of my page...


all Evalicious products used:


i hope you enjoyed my little tutorial and start looking at your Evalicious stamps a little differently to see how you could alter then just a little to expand your crafting options. :)

have an awesome day!


Friday, June 7, 2013

Pool Day | Inspiration

I used to print photos as I scrapbooked, which was a big time waster.  I could spend way more time looking for the perfect memory than scrapbooking it and it kept me from making pages much of the time.  Now I do a little better and leave a stack of printed photos right on my table so I always have something ready.  I may still and search for a photo, but at least I can try the stack first.

But I was thrilled to have my stack ready when I ran across the Real Life Label Snipsnip Tags in my Evalicious stash.  Why I had not used any of the whole sheet, I don't know.  I love them!!  I had to use them.  So, what photo?  The top one in my stack.  Yay for being prepared!


This is a iPhone shot of me and the crew headed home from the first pool day of the year.  (My dear hubby was driving and not in the picture.)  It was the best day.  Nothing fancy.  Nothing out of the ordinary.  Just a regular day.  Real life!!!


I started with kraft cardstock, which is kind of boring to me, so then came the messy gesso.  To add some fun color I stitched with blue thread all the little lines through the gesso.  I got that I idea from Wilna, and I love it.


The I cut up the entire sheet of Real Life tags and layered them right over the stitching.  The colors are amazing and fun and perfect for our day.


Of course, I had to add in some badges because honestly, I love them.  How could I leave them off??

And that is real life for me.  What about you these days?

So besides the Real Life Label Snipsnip tags, I also used Real Life V2 Badges, Escape V3 Badges, and Colorful Days Badges.  I love it all!!

~ Corrie

Friday, May 31, 2013

Harvest | Inspiration

It's Natalie here, sharing with you one of my new favourite layouts.

Having an orchard back on my parent's farm has many benefits. There's always something to pick and a new crop to harvest. Autumn this year has seen us with an abundance of pistachios and green apples. Apple crumble is a firm favourite - especially with a crunchy roast pistachio crust. Yumm!


I took my inspiration for this layout first from the apples themselves as I punched out rows of circles from green paper. Then in one of those rare strokes of genius I realised I could fill them with bunches of round Evalicious products.


Firstly came the Badge Buttons. That one was kind of obvious.
Then I thought of all the different 1" circle stamps Evalicious has produced. These were just the perfect fit. I stamped them seperately before punching them out and mounting them on foam tape to give some dimension.


And one last hint... just when you think you want to use some fabulous Evalicious typography but it comes in the wrong size.... customise it! The banner reading "The Good Life" was going to be the perfect match for my layout but the problem was it was printed on the top of a 3x4" Tag which wouldn't fit in the cluster I envisioned. So I simply cut it out!


What have you been creating lately with your Evalicious goodies? We'd love it if you shared it with us in our very own Flikr pool! You may even win a prize at the end of the month :-)
Thanks for stopping by.

Evalicious Supplies:

Escape Badge Buttons V2
Escape Badge Buttons V3
Escape Snipsnip Labels
Escape Miscellany Tags
Real Life Large Tags
This & That Large Tags
Getaway Badge Buttons
You & Me Stamp Set
Open This Stamp Set
His & Her Story Stamp Set
I Eat Stamp

xxx
Natalie

Wednesday, May 29, 2013

Home | Inspiration

Hi, it's Vee here to share with you a layout inspired by Evalicious newest release, Escape! Like the rest of the team I am in love this line.  I used the line to accent home photos as a lot of the sentiments from the tags can apply to home life too!


On this layout I used a collection of various 2x2 photos that I've taken this year so far.  An unexpected and happy addition to our home this year is our puppy, Ruby.  She has filled a void left three years ago by our miniature schnauzer, Aiden.  I used neutral tags and badges  because of the bright background and colorful photos. The neutral accents also makes the misted white background stand out more as well.


evalicious products used-escape v1 badge buttons // escape v3 badge buttons // escape miscellany tags // escape snipsnip labels

 I cut circles out in different sizes to act as a frame and to add focus to the strip of photos on my page.  The escape badge buttons add 3D dimension to these cluster of circles.


Thank you for stopping by and don't forget to add your Evalicious' creations to the Flickr pool! xo

Friday, May 24, 2013

Driving the Bus | Inspiration

The new stuff is in the shop and wow, I love it.  The Escape pieces have a travel theme to them that is so perfect now that I have summer break on the brain.  (One more week!!!)  Anyway, we have not had any trips lately but I really wanted to use these new fun items, so I just needed to make them work.

I searched through my photos and found two that I already had printed but had done nothing with.  Yippee!  These are pictures of my daughter on an old bus at the train graveyard outside Atlanta.  It was a cool day we spent exploring a piece of history with our cameras.  The lighting in the bus was incredible.  And it was really interesting to see my girls walking into a different time period.  But anyway...

The pictures of her on this bus and the Escape tags and badges just fit together good enough.  It was time to create.


I started by laying out tags through the center of my background.  They looked cool, but I wanted to make sure to tone them down a little to the photos were the boldest thing on the page.  I added this pretty star vellum over the tags.  You can still see them, but the boldness of them is muted.


I really liked the way it turned out.  There but not overwhelming.  I of course had to add some badge buttons as well.  Love those.  I thought the geo tag one helped with the whole destination feel.  I know she is not really driving the bus and we were not traveling, but the pictures tell a story themselves and the tag just worked!

Definitely check out the new awesome shop items!!  You will love them!

Wednesday, May 22, 2013

Fresh Air | Inspiration

Hello! It's Michelle here to share a layout I made for my inspiration post. When I got the new goodies from the Escape line, I knew I had to use them! I like that the line doesn't have to be used specifically for travel, most of the items can work for everyday events. 


For this page, I used a photo from Banff when we reached the top of the gondola and walked around. I selected mostly blue and orange Evalicious tags and badges to use for a pop of color against the neutral grey background. I added subtle stamping to the background for added detail.

To make the tags stand out more, I used pop dots as adhesive. As you can see in the photo above, I definitely needed to change my paper trimmer blade!

I used a badge and paper tag from the Escape line and layered them over the corner of my photo. To go with the blue/orange theme, I added clothespins as an embellishment.


Thank you for stopping by! We'd love to see what you make with your Evalicious goodies, don't forget to share your creations in the Flickr pool!

Evalicious products:

escape v3 badge buttons
escape large tags
escape snipsnip labels
escape miscellany tags
love this banner stamp
cloud outline stamp
hello arrow stamp

Monday, May 20, 2013

Emboss & Watercolor Resist | Tutorial

Hi Evalicious fans!  Christine here to show you a video tutorial on the stamp emboss & watercolor resist technique I used on this layout of our trip to AT&T Park in San Francisco!

20130512_Evalicious_CLN (1)

I will show you step-by-step, how to stamp and emboss the white images onto your paper.
20130512_Evalicious_CLN (5)

And how I watercolor over the embossed images to create looks like these.
20130512_Evalicious_CLN (6)

Here’s my emboss & resist video.  It is under 7 minutes.  I hope you enjoy watching my process and learning about stamp emboss and watercolor resist!  :)  You can click over to youtube to see it slightly larger.


Evalicious Supplies:

Have a great Monday!
Christine

Friday, May 17, 2013

Ready, Set, Go | Inspiration

Good morning everyone!

Emmanuelle here today for some insipiration.
Here is a layout I made with some pictures taken one and a half year ago. We are still waiting for a proper spring here in Belgium (that is why my pics are a little bit dark...it's been raining the whole week... sorry about that), and I just need some sun.
That's why I decided to use pictures from a sunny day in Malta. And those pics from holidays spent abroad where perfect to start using the enw Escape colletion. I love the colors of this collection. And once again it's so versatile that you can use it for any theme.


I am just in love with this light blue and grey association, with a touch of orange, aren't you?
 
Evalicious supplies:

Have a lovely week-end and be scrappy ;) (and if you are, don't forget to post your projects using Evalicious supplies into our Flickr pool.

Friday, May 10, 2013

Starfish | Inspiration

It's Natalie here today. I couldn't wait any longer to share with you my excitement about the newest Evalicious collection!  It's called Escape and is designed firstly as a travel/holiday line, but can be used for many other occasions too.


However given I've only just returned from a tropical beach-side holiday myself, I knew it was going to be perfect for scrapping the thousand new photos I've got!


With so many photos it's not going to be possible for me to only scrap single-photo pages. Plus, using multiple images always tells the story better I think. I merged these 3 i-Phone photos into a single 4x6" collage using the app 'Picframe' and printed them out as one. That means I can use all these snaps without taking up too much space on my page. Yay!


Next, with my whole story to share I grabbed one of the Large Tags from the Escape collection and typed up my journaling. They're big enough to write quite a bit without being too obtrusive on your page, and it created a nice balance against my photos. I layered up a few other tags in both my clusters too. Foam tape is definitely your friend with this technique ;-)


Lastly, it's all about the stamped details for me. I like to include the date on my pages so the 'photographed' stamp from the Hello Photo set created a lovely space for it, and the Cloud Outline was a fun decoration in the opposite corner.

Have you got holiday snaps to scrap? If so, you'll definitely want to get your hands on the Escape collection. They're just perfect!

Supplies: 
Escape Large Tags
Escape Miscellany Tags
Escape Snipsnip Labels
Escape V1 Badge Buttons
Hello Photo Stamp Set
Cloud Outline Stamp

Back to reality for me now.
See you next time.
xx
Natalie